Summer Ruche

Thursday, September 30, 2010

Tutu easy


My baby girl is turning 1 next week. Yes... very bittersweet. I am however tickled pink (literally) to throw my very first girly birthday party! But since we are on a budget, I am forced to be crafty.


YAY!
Even though many of my crafts or d.i.y. projects LOOK homemade, I still get a strange sense of pride, just knowing that I DID IT!
So anyway... back to the party!
I have been doing a lot of online window shopping to compare prices on tutus, because I so desperately want my little darling to wear a tutu on her birthday. Don't ask why... I don't know! It's just girly! Well, remember that part about being on a budget?? Yep... there was no way my baby was going to be in a tutu, on the budget I've set, but since I already had the idea, I was determined to find a way!!
After all of my research on tutus, I discovered LOTS of people making their own no-sew versions, and selling them on Etsy, Ebay, and other online venues, and I thought to myself...

"If they can do it, so can I!"
I began tulle shopping, and discovered why everyone and their dog is making these tutus... tulle is incredibly cheap! (I would like to say sorry to all of my friends out their who are trying to make a living off of tutus... I'm quite sure yours are worth the asking price and much more polished and finished than my own.)

I quickly bought 2 lovely shades of pink, 6 inch wide, spools of tulle. Altogether with the shipping and handling, it was a whopping $6!!! My budget was loving me!

I originally bought ribbon to tie it onto, but before I opened it, I thought really hard about any way I could simplify the steps, and of course... try to use something I already have. I LOVE it when I can repurpose something I already have!


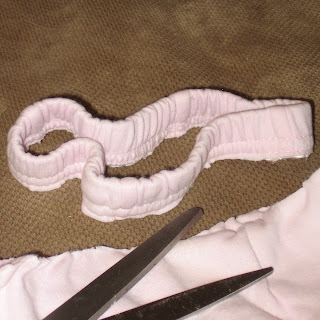
Too save time trying to measure my squirmy little red-head's waist, and trying to figure out the length needed to create and fasten the ribbon or elastic, I grabbed a stained pair of elastic waisted pants that were way to short for her now, and simply cut the waist band off, leaving me with an easy on-and-off, perfect fitting waistband.


I then cut 1 ft sections of the darker "rose" colored tulle, and 18 inch sections of the lighter pink. Why? Because I like to complicate an already simple thing. :)


I started a pattern as I knotted them around the band. I would tie on 2 of the shorter rose pieces with the knots centered on the outside of the band, then 1 of the longer light pink ones, with the knot going straight down on the bottom edge of the band. This way the shorter darker ones create a puffier tutu around the waist, while the light pink falls beneath in more of a skirt like tutu.

Some of you may like it more simple, and can use just one of the techniques, to acheive whatever affect you are looking for.

But I am more than satisfied with my end result for the purpose and price that I was aiming for.


I used:
-2 shades of tulle
-old elastic waistband from some cotton pants

Tuesday, September 28, 2010

Rockas!

Easy-peasy!

We did a quick one today. My son calls them "rockas" (maracas). We washed out our yogurt cups from lunch, and filled about a 1/3 of the way with popcorn (unpopped of course). I hot-glued cardboard tops on them, that we traced and cut beforehand from a recycled cracker box, and then hot-glued plastic knives left over from my son's birthday party. This took us less than 15 min, and both kids played with them right up until bedtime!

Great entertainment, but our version didn't involve my son too much in the production phase.

I suggest...
If you have any of the clear plastic Gerber baby food containers, to use them. You can be much more creative with the contents of the shakers, with things like colored beads, dried beans, glitter, rice or painted pasta. Then your little one will feel he or she has put their own signature on it, and he or she can see the fruits of their labor. Plus you would already have a lid to glue on and wouldn't have to trace, and cut one out.


We used:
-yogurt cups
-popcorn
-cardboard
-hot glue
-plastic knives


You could also try:
-rice, beans or beads
-plastic baby food containers, or clear fruit cup containers
-popsicle sticks

Monday, September 27, 2010

Cuttin' up at lunch!


It's okay to play with your food! Well, maybe just sometimes... :)
Today I got creative with my son's balogna and cheese, and thought it was too cute not to share.
I know! I know what you are thinking...
"Jill... it's not even October yet!"
I really am aware of that. I am just on this pumpkin kick right now... even my coffee creamer is pumpkin! But I promise to try hard to get my fall fix in other ways for a while. Okay?
Then again... if I do them all now, I just might inspire some of you for your own craft-filled October!

Decking out the porch light!


Okay... so I will admit... I'm pretty proud of us on this one. It turned out so much better than I had expected!


So here is the story behind it...

My son has been asking to carve a pumpkin. We all know that if we were to have carved his pumpkin, mid-September, it would have been a rotted, nasty mess before Halloween arrived. So I knew our next craft would have a pumpkin worked in somehow.


The plan started out as just a painted cardboard jack-o-lantern, with orange tissue paper on the back. Then I thought we could light it, by making it a light cover for our porch light, and measured accordingly and attached it, using only pipe cleaners and 2 beads. (Let me mention here that the scary face was HIS idea)


But...

Since that took NO time at all, and he wanted to keep painting, I squashed one toilet paper tube and one paper towel tube, and cut them up. We then painted all 26 "leaves" and I tied them together with string and beads and tied them onto the light as well.


And VOILA!


We are both so proud of our front porch. :) He now insists on going out each night, to admire his handy work.


We used:
-cardboard (I used the back flap of an old notebook)
-red, yellow, green, and black paint
-string
-beads
-toilet paper and paper towel tubes
-orange tissue paper
-pipe cleaners

Tip:
Instead of orange tissue paper, you can flatten a coffee filter and paint it with water colors, and let dry.

Crowns


My son had been begging me to use these sparkly pipe cleaners for a while now, but I never could implement them into our crafts. On one particular day that I was getting a lot accomplished, he was relentlessly begging me to do a craft with him, and it came to me! Trying not to get impatient with him, I ripped off the rubber gloves, fled to the kitchen and tore open the pipe cleaners. In an overly dramatic voice I proclaimed "We're making crowns! What color do you want?!" I started out quickly bending and twisting... then... slowly... I started enjoying myself and carefully (but efficiently) produced 2 neat crowns, and one content little boy. I then went back to scrubbing toilets, but this time as the Queen of Hearts. The small king? He finished out his morning giving orders to the several army men and stuffed animals in his bedroom kingdom.

We used:
-pipe cleaners

Mobile


Okay... So this one turned out to be more time consuming than I had originally planned. AND... it just hangs in my son's room, collecting dust. So, this isn't a favorite of ours, just because of the fact that he can't play with it. BUT! On the up side... he had a ton of fun making it! We basically just cut circles out of construction paper, and glued 2 together at varrying lengths on three strings. We then painted all the circles on both sides with glitter glue. Oh! We also strung some beads in between them. It looked a bit sparse, so instead of taking the time to cut, glue and paint, I halved a few large white address labels, and stuck them together on the string, and let Maize pick out and place stickers on all sides of them. Due to my lack of planning on this one, we spent a lot of time, used a lot of stuff, and made a lot of mess. But like I said... my son had plenty of fun, and that's what matters the most to me. :)

We used:
-hanger
-string
-construction paper
-glue
-beads
-glitter glue
-address labels
-stickers

You could also use:
-pretty much ANYTHING!!! This is something you could make even more complicated or much simpler.

Paper Hand Puppets


We had lots of lasting fun with these fun paper puppets! We saw them in our Family Fun magazine, and I've post the link below, for more detailed instructions. We made the frog from the magazine, but decided to create our own bunny, to hop along with the frog. :) SUPER-DUPER easy! This one keeps them occupied for much longer than craft time.

http://familyfun.go.com/crafts/paper-puppets-909092/

We used:
-green construction paper
-pink and white notebook paper
-Sharpie
-gluestick

You could also try:
You could easily do this craft with regular notebook paper, tape and crayons. The possibilities are endless!

Scavenger Hunt + Counting = FUN!

Who doesn't love a scavenger hunt?! This one is pretty self-explanatory. To get us ALL out of the house, I made of list of things my son could identify, and that I knew we could find in our limited surroundings, put the baby in the stroller, and we went for a walk. When we found something on our list, I had my son find a certain number of them, and place them in his little bucket. We then went home and turned them into an art project. My son practiced his counting, explored nature, and discovered the joys of liquid glue!! His favorite part though... showing Daddy. :)
We used:
-glue
-construction paper
-sharpie
-nature!

Painting with water... literally!


So this probably seems like I'm desperate for something to post, but I'm not. I needed some more outdoor activities for my son, that kept us close to home, while my daughter was napping indoors. We are currently in an apartment, which means limited yard space. So I had to get creative. With an old make-up brush and a Halloween bucket full of water, my son painted. As you can see it worked quite well! The entire sidewalk was his canvas, that"magically" erased itself after a while (thanks to the sun), constantly giving him new work space! My favorite part of this activity... NO CLEAN UP!!!

We used:
-make-up brush
-bucket
-water

You can also use:
-sponges, toothbrushes, or paint brushes

Countdown Calendar


In March, 2010, my two children and I were preparing to move from SC to TN to be with my husband who had gone before us a few months prior, to start a new job and house hunt. My son was EXTREMELY excited when I informed him, but of course did not understand that we couldn't just GO! Silly Momma... I should have known. Kids at this age don't get the whole 'time' thing. When you say "Maybe someday soon we can go to the zoo", to a toddler, they run and get their shoes, and wait at the door! So when he began asking me EVERY MORNING as soon as he woke... "Are we going to Tennessee today Momma?"... I decided to make a count down calendar to help him understand. Then every morning, he got to put another sticker on the calendar and count how many more days until we move. It was so easy, and a big help.
We used:
-construction paper
-sharpie
-stickers

Beaded necklace

One of my first crafts with my son, besides crayons and water paints, was this beaded necklace. He was 2 and a half at the time, and he loved it! It can also be educational. You can teach colors and counting while making it, and it also is wonderful for their hand and eye coordination.

We used:
-plastic beads
-leather craft rope

You can also use:
-string, yarn, ribbon, or an old shoe string!
-instead of beads try elbow pasta or cereal (cheerios or fruit loops) however it obviously won't last as long